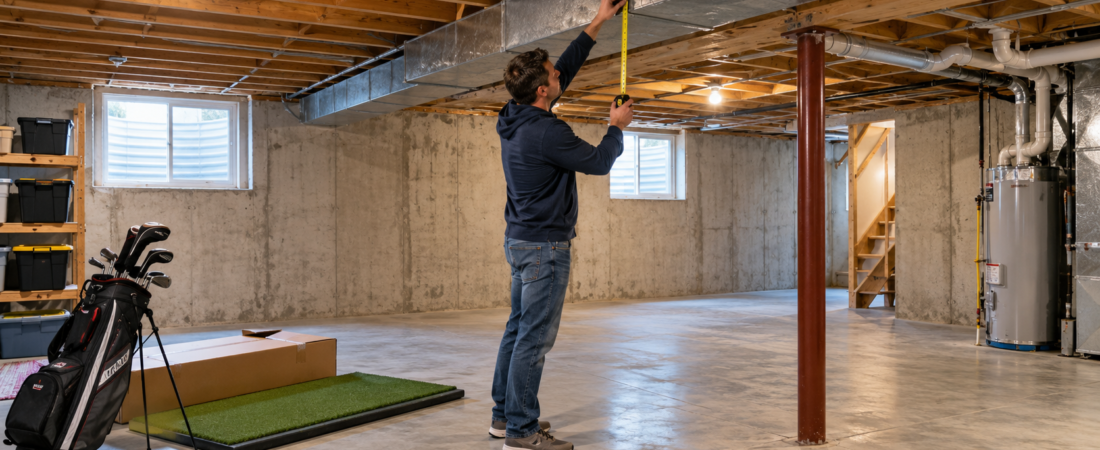
A basement can provide a quiet, controlled setting for a home golf simulator. It is protected from outdoor weather, usually offers predictable lighting, and can often be developed into a dedicated practice or entertainment space.
The main challenge is usually ceiling height. Beams, ductwork, pipes, support posts, and soffits can further reduce the usable area even when the basement’s overall dimensions appear sufficient.
Before buying equipment, measure the complete swing area, inspect the basement for moisture, and identify any areas that must remain accessible. A successful basement simulator must fit around the structure and mechanical systems of the home as well as the golfer.
Start With Ceiling Height
A 10-foot ceiling is the best target for most full-swing simulators, but many basement installations work well with 9 feet of usable height. The golfer’s height and swing plane ultimately determine whether the space will work.
Measure from the finished floor to the lowest obstruction above the intended hitting position. Floor joists, beams, ductwork, pipes, lights, and projector mounts can all reduce the clearance available to the club.
Test the space with the longest club you’ll use. Include the thickness of the future hitting mat because even an additional inch or two beneath the golfer can make a borderline ceiling feel restrictive.
Measure Around Beams, Posts, and Mechanical Systems
Basements rarely provide the same open rectangular space shown on a floor plan. Support posts, stairways, utility rooms, plumbing, and heating equipment can divide the room or interfere with the target line.
Measure the width and depth at several points and mark the proposed screen, ball, and golfer positions on the floor. Check the full swing path on both sides of the golfer, not just the open space directly ahead.
Do not assume that pipes, ducts, posts, or structural components can be moved. An appropriately qualified professional should evaluate any proposed alteration before the simulator layout depends on it.
Check for Moisture Before Installing Equipment
A basement that feels dry during normal weather may still experience dampness, condensation, or water intrusion after heavy rain. Moisture can damage electronics, flooring, screen material, framing, and stored golf equipment.
Inspect the proposed area for staining, musty odors, efflorescence, damp flooring, and evidence of previous water entry. Confirm that floor drains, sump equipment, and plumbing remain accessible.
Correct known moisture problems before installing turf, padding, or electronics. Covering a damp surface can hide the problem and lead to a more expensive repair later.
Protect Low Ceilings and Nearby Walls
Basement walls are often concrete, masonry, or finished drywall over a hard structure. Shots that miss the impact screen can damage the room, damage the golf ball, or rebound unpredictably.
Side barriers, wall padding, and ceiling protection should cover areas you can realistically reach from the planned hitting position. High-lofted clubs deserve particular attention when the ceiling is relatively low.
Protective material is intended to contain errant shots, not compensate for inadequate swing clearance. The golfer should be able to swing normally without expecting the club to contact the ceiling or padding.
Plan for Noise Above the Basement
A basement simulator may be separated from the main living area, but golf impact noise can travel through ceiling joists, ductwork, and walls. The sound of the club striking the ball and the ball reaching the screen may be noticeable in rooms above.
Impact-screen material, screen tension, padding, rugs, and acoustic treatment can help reduce reflected noise within the simulator room. Soft finishes generally make the space less echoing than exposed concrete and unfinished framing.
Acoustic material and ball-protection material do not always serve the same purpose. Any surface that could be struck by a golf ball should be designed and secured for impact, not selected for sound absorption alone.
Create a Stable, Level Hitting Surface
A concrete basement floor provides a solid foundation, but it can be uncomfortable and unforgiving beneath a thin hitting mat. A quality mat or properly constructed platform can provide better support and create a more finished simulator area.
Check the floor for slope, cracks, uneven patches, and moisture before installing turf or underlayment. The hitting surface should remain level and stable during repeated swings.
Plan transitions carefully if the simulator floor will be raised above the surrounding basement. Clearly defined edges or gradual transitions can reduce tripping risk when people enter or leave the hitting area.
Control Lighting and Projector Placement
Basements often provide good control over natural light, which can improve the projected image. However, existing ceiling lights may create glare on the impact screen or interfere with an overhead launch monitor.
Position lighting so the golfer, controls, and walking areas remain visible without directing unnecessary light toward the screen. Low ceilings may require recessed or carefully placed fixtures that stay outside the swing path.
The projector must produce the correct image size from the available mounting distance. Include its bracket and housing when measuring ceiling clearance, and position it to avoid both the club path and golfer shadows. The projector must produce the correct image size from the available mounting distance.
Confirm Power, Internet, and Ventilation
A simulator may require power for the launch monitor, projector, computer, display, lighting, and accessories. Plan outlet locations before installing wall padding, turf, or a permanent enclosure.
Keep cords away from the golfer’s stance and walking paths. If the planned equipment requires new outlets, wiring, or additional electrical capacity, have those needs evaluated by a qualified electrician.
Test the basement internet connection as well. Software activation, updates, online play, and cloud-based features may require a dependable wired or wireless connection. Adequate airflow is also important for the golfer and heat-producing electronics.
Keep Utilities and Exits Accessible
Electrical panels, water shutoffs, sump pumps, cleanouts, furnaces, water heaters, and other household systems must remain accessible after installation. Avoid placing permanent framing or padding where it prevents inspection or service.
Windows and doors may also serve ventilation, access, or emergency purposes. Do not permanently block a required exit or emergency escape opening with an enclosure, screen, or wall treatment.
If you plan to substantially remodel the basement, confirm the applicable local requirements before construction begins. Planning around these areas from the start is usually easier than dismantling part of the simulator when service or inspection is needed.
The Bottom Line
A basement can become an excellent home golf simulator if it has enough swing clearance and stays dry, accessible, and comfortable. Confirm the ceiling height first, since it is often the hardest limitation to fix.
After confirming the swing area, plan the enclosure, impact screen, hitting position, launch monitor, projector, protective coverage, flooring, and utilities as a single, integrated system.
Working with the basement’s structure rather than forcing equipment into an unsuitable layout will create a safer simulator, protect the home, and make the space more enjoyable to use.