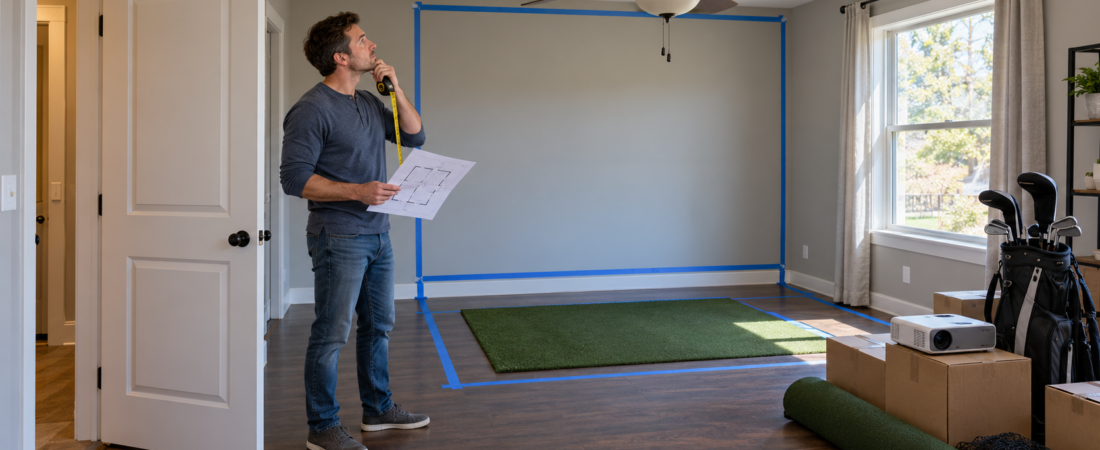
Building a home golf simulator can be an exciting project, but it also involves more planning than many people initially expect. The screen, enclosure, launch monitor, projector, hitting mat, and room itself all need to work together. A mistake in one area can affect several other parts of the finished setup.
Most planning problems can be avoided before anything is ordered. Careful measurements, realistic expectations, and a complete equipment plan can help prevent expensive changes later.
Buying Equipment Before Measuring the Room
One of the most common mistakes is choosing equipment before confirming the usable dimensions of the room. An enclosure that appears to fit on paper may leave too little space for the golfer, projector, or surrounding protection.
Measure the room’s width, depth, and ceiling height before comparing products. Do not rely entirely on dimensions from a floor plan or real estate listing. Measure the actual room and account for baseboards, trim, doors, windows, support columns, garage-door tracks, light fixtures, ceiling fans, and anything else that reduces the usable space.
The enclosure is only one part of the measurement. You also need enough room behind the screen, space between the screen and hitting position, and clearance behind the golfer.
Checking Ceiling Height Without Testing a Full Swing
A ceiling may seem high enough until someone swings a driver. The golfer’s height, swing plane, club length, and hitting position all affect the clearance required.
Before committing to the room, stand where the hitting mat is expected to go and make several slow, controlled practice swings with the longest club that will be used. If more than one person will use the simulator, the tallest golfer or the person with the most upright swing should test it as well.
Remember to account for any flooring, turf, hitting mat, or raised platform that will be added later. Even a few inches of additional floor height reduces effective ceiling clearance.
Focusing on Width but Forgetting the Golfer’s Position
A room can be wide enough for an enclosure and still feel cramped at the hitting position. Many golfers do not stand directly in the center of the room, especially when the simulator uses a centered hitting area.
Right-handed golfers need enough room on one side for their stance and backswing. Left-handed golfers need that space on the opposite side. A simulator intended for both may require a wider room, an offset hitting position, or equipment that can accommodate players hitting from different locations.
Doors, cabinets, shelves, and wall-mounted equipment can also interfere with a swing even when they do not interfere with the enclosure itself.
Leaving Too Little Room Behind the Golfer
Room depth is sometimes judged only by the distance from the hitting position to the impact screen. That leaves out the space behind the golfer.
The golfer needs enough room to swing comfortably without feeling crowded by a wall, furniture, or another person. Additional space may also be needed for a computer, seating, club storage, or guests.
A launch monitor can impose its own depth requirements. Some units sit beside the ball, while others need space behind the hitting position to observe the ball and club. Those requirements should be checked before the room layout is finalized.
Placing the Golfer Too Close to the Impact Screen
Standing too close to the impact screen can increase the chance of a rebounding ball reaching the golfer. It can also make the projected image uncomfortable to view and limit the amount of ball flight available to certain launch monitors.
There is no single hitting distance that works for every simulator. The proper distance depends on the enclosure, impact screen, launch monitor, room dimensions, and the manufacturer’s installation guidance.
The screen also needs sufficient clearance from the wall or objects behind it. An impact screen flexes when struck, so placing it directly against a hard surface can increase noise, bounceback, and wear.
Choosing Components Separately Instead of as a System
A common planning mistake is evaluating each component independently. A screen may fit the wall, a projector may have excellent specifications, and a launch monitor may receive good reviews, yet the three may not work well together in the proposed room.
The enclosure determines the available screen size. The screen dimensions affect the aspect ratio. The aspect ratio and image size influence projector selection and placement. The hitting position affects both the launch monitor and projector. Protective panels, flooring, and lighting must fit around everything else.
Planning the complete system before ordering makes it easier to identify conflicts while they can still be corrected.
Choosing the Projector Too Early
Projectors should be selected after the screen dimensions, aspect ratio, and approximate mounting location are known. Buying one based primarily on price, resolution, or brightness can result in an image that does not properly fill the screen.
The projector’s throw ratio determines how far it must be from the screen to produce a particular image width. Ceiling height, enclosure depth, and the golfer’s position also affect where the projector can be installed without creating shadows or placing the equipment in danger of being struck.
Before purchasing a projector, calculate the required throw distance for the actual screen size. Also check whether the lens position and available image adjustments are suitable for the planned mounting location.
Ignoring Screen Tension and Bounceback
An impact screen needs to be secured well enough to remain relatively smooth, but tighter is not always better. A screen that is stretched too tightly may produce more bounceback and place unnecessary stress on the material and attachment points.
A screen installed too loosely may develop excessive wrinkles or sag into the projected image. It may also interfere with the floor or surrounding enclosure.
Follow the screen manufacturer’s installation instructions and leave enough room for the material to absorb the force of a golf ball. Foam bumpers or other soft materials near the lower edge can help cover exposed framing and reduce unpredictable rebounds.
Underestimating Wall and Ceiling Protection
It is easy to plan around well-struck shots and forget about mishits. Golf balls can travel above the enclosure, sharply to either side, or backward after hitting a hard surface.
The amount of protection needed depends on the golfers, the room, and the enclosure. Beginners, children, and guests may produce a wider range of shots than the person who designed the simulator.
Pay particular attention to the areas beside the screen, the ceiling above the hitting zone, nearby windows, exposed framing, and any hard edges that could send a ball back toward the golfer. Wall padding, side barriers, ceiling protection, and a properly designed enclosure can help create a safer and more forgiving space.
Treating the Hitting Mat as an Afterthought
The hitting mat is the surface the golfer interacts with on every shot. A mat that is too thin, too firm, unstable, or uneven with the surrounding floor can make the simulator less comfortable and less enjoyable to use.
Repeatedly striking a hard surface can place additional stress on the hands, wrists, elbows, and shoulders. The mat should provide a stable stance while allowing the club to interact with the hitting area in a reasonably natural way.
The hitting surface should also be level with the stance area. If the ball sits noticeably above or below the golfer’s feet, the setup can affect both comfort and practice quality.
Forgetting About Electrical Service and Cable Routing
A home golf simulator may need power for the projector, launch monitor, computer, television or monitor, lighting, speakers, fans, and other accessories. Plugging everything into the nearest extension cord is not a good long-term plan.
Identify the required outlets before installation begins. Make sure the electrical circuit can support the planned equipment, and consult a qualified electrician if new outlets or circuits may be needed.
Plan cable routes at the same time. Power cords, HDMI cables, network cables, and USB connections should be protected from golf balls and kept away from walking areas. If cables will run through walls or ceilings, determine that before the room is finished.
Overlooking Lighting, Heat, and Ventilation
Normal room lighting may interfere with the projected image or create glare on the screen. At the same time, the hitting area needs enough light for golfers to see the ball and move around safely.
Adjustable lighting can help balance those needs. Fixtures should be positioned where they will not be struck by a club or block the projector.
Computers, projectors, and people can also make a smaller room warmer than expected. Garages and basements may already have temperature or humidity challenges. Heating, cooling, airflow, and moisture should be considered before the simulator becomes a finished room.
Ignoring Noise Until the Simulator Is Finished
Golf simulator noise comes from more than the club striking the ball. The ball hitting the screen, the club contacting the mat, and rebounds from hard surfaces can all carry into nearby rooms.
Rooms with concrete floors, unfinished walls, or low ceilings may sound especially loud. Turf, foam underlayment, wall padding, insulation, and other soft materials can help reduce echoes and impact noise.
If the simulator is near bedrooms, shared living spaces, or neighboring homes, consider when it will be used and how much sound control may be necessary.
Failing to Confirm Product Compatibility
Not every enclosure, screen, projector, launch monitor, and accessory is designed to work with every other product. Mounting hardware may differ, enclosure dimensions may be listed differently, and launch monitors may have specific requirements for lighting, ball flight, or placement.
Review product specifications and installation instructions before ordering. When something is unclear, ask the manufacturer or seller whether the products are compatible with the planned room and equipment.
Custom-sized products deserve particular care because they may not be returnable. Measurements and specifications should be checked more than once before a custom order is placed.
Planning Only for the Initial Purchase Price
The equipment price is not always the complete cost of a home golf simulator. Freight, electrical work, mounting hardware, cables, protective materials, flooring, software subscriptions, and room improvements can add to the total.
Delivery costs can be particularly important for large enclosures, screens, and wall-padding products. Return shipping may also be expensive if an oversized product does not fit.
Create a complete working budget with a reasonable allowance for overlooked items. If necessary, build the simulator in stages, beginning with the components needed for safe and functional play.
Making Permanent Changes Before Testing the Layout
Even careful measurements do not always reveal how a simulator will feel in actual use. Whenever possible, mark the enclosure, screen, hitting position, and equipment locations before installing anything permanently.
Painter’s tape can be used to outline the footprint on the floor and walls. Boxes, temporary markers, or a portable mat can help represent the proposed layout. Practice swings can then reveal clearance problems that were not obvious on paper.
This simple test can also show whether the golfer feels crowded, whether the hitting position is comfortable, and whether doors or walkways remain usable.
The Bottom Line
Most home golf simulator planning mistakes happen when one part of the project is considered without accounting for the rest. The room, enclosure, screen, launch monitor, projector, protection, and flooring form a connected system.
Start by measuring the room carefully, testing the actual swing area, and reviewing the requirements of every major component. Then lay out the entire simulator before making permanent changes or placing custom orders. A little extra planning at the beginning can prevent expensive corrections and produce a simulator that is safer, more comfortable, and more enjoyable to use.